BMWdiy.INFO
E39 Euro-spec CELIS "LED" Tail Light
Retro-Fit Kit
Prepared by VietSB
Modified 02.17.04
NOTE: Perform these steps at your own risk. All P/N's listed are a "best guess", so please double-check with your local dealer. These mods and repairs were performed on my US-spec 1997 540iA (11/96 prod date, M62 engine) but there is no guarantee they will work on other E39's. These instructions are provided for entertainment purposes only!
BACKGROUND: Better detailed instructions and exact measurements are provided in the Hella install guide that comes with the Euro-spec assembly light retro-fit kit, but I thought I'd show pics of the basic install for anyone wondering how difficult it is. Total time for installation is approximately 60-90 minutes per side depending upon experience, tools available, and how careful you are. Experience definitely helps, so the 2nd light install usually goes much faster than the first.
Note that the Euro-spec assemblies do not have the 4 red LED's on the side, which is required for DOT-approval.
WARNING: I currently do not recommend attempting to fit US-spec assemblies into pre-2001 E39's due to reports from other owners that even with the appropriate drilling and notching, they still do not fit in the car's tail-light buckets. I haven't investigated this firsthand, but heard of a number of owners purchasing US-spec lenses off sources such as eBay and being misinformed they will fit with minor modifications into pre-2001 E39's which proves to be incorrect. Here's one report of this problem. Besides the fitment issues, I noticed the wiring harnesses might be similar, but the number of wires and positioning in the connector could be different. Lastly, you'll still require the retro-fit kit's voltage regulators, wiring harnesses, and mounting bracket + hardware. The way around this would be to modify your car's wiring and replace the LCM as well as other things I might not know about. Better to just buy the Euro-spec retro-fit kit.
Please Note: These upgrade parts are possibly available at Evosport.com, Bekkers.com, Supreme Power Parts, or Bavarian Autosport. I haven't bought from these vendors recently, so please don't e-mail me asking for sources. Check with these vendors or ask on the Roadfly.com E39 Message Board for more recent references.
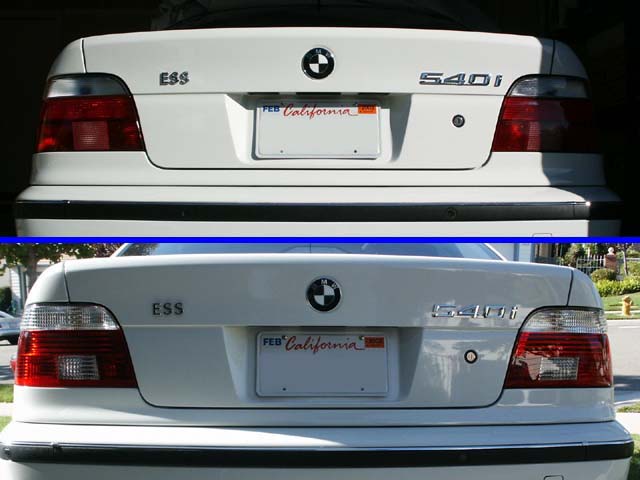
Before (above) and after (below):
Required Parts:
- Hella Euro-spec CELIS tail light retro-fit kit (pre-2001 vehicles require a *COMPLETE* retro-fit kit - post-2001 came with CELIS lights so these instructions don't apply)
- Touch-up paint or other anti-corrosion metal treatment
- Tape or equivalent cable-management parts
- Plastic bag and fastening tape
Recommended Parts:
Required Tools:
- Door panel puller
- Metric ruler
- Punch tool
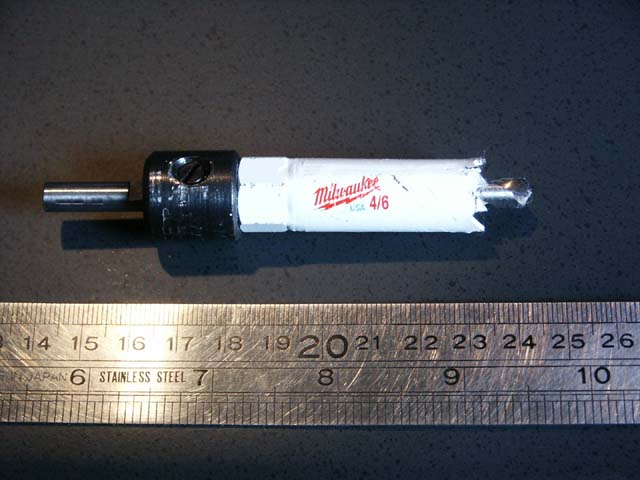
- Drill, 8mm metal drill bit, 16mm (~4/6") metal hole saw bit
- Dremel or equivalent
- File or rasp
- 1/4" ratchet, extension, 8mm, 10mm socket
- Vacuum cleaner
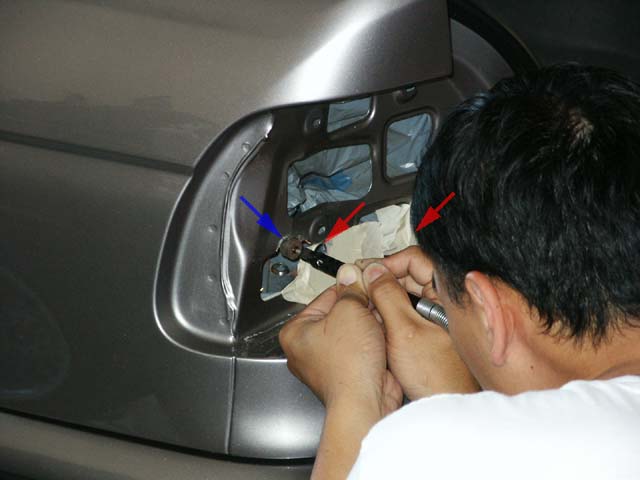
1. After unplugging, unbolting, and removing the original light assemblies, clean the tail light buckets and tape the plastic bag on the inside of the trunk to catch the metal shavings.
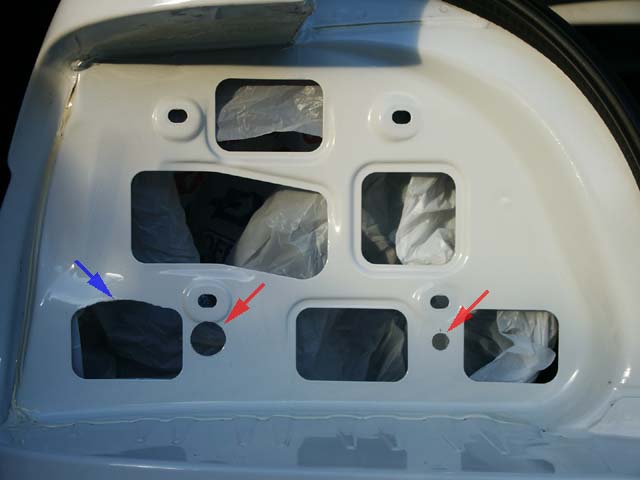
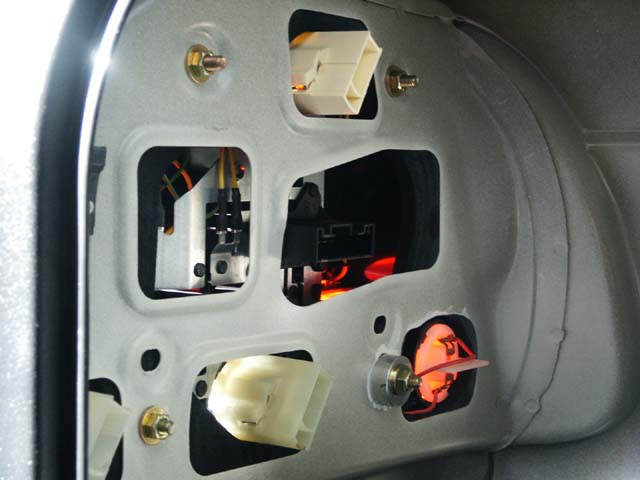
2. The tail light buckets require an 8mm and 16mm hole to be drilled (see red arrows, and "no" not in his head!) and a crescent-shaped notch to be grinded away (see blue arrow) to allow for the different mounting holes and assembly shape. Be sure to use the exact measurements as outlined in the Hella guide and perform a mirrored operation on the other side.
3. Here's a picture of the finished driver side prior to using the file or rasp to remove any remaining metal shavings and before applying the touch-up paint or other anti-corrosion treatment. Once dry, use the vacuum to clean up the area.
4. Carefully line-up and attach the sticky side of the foam gaskets to the back of the light assemblies (not the car body). Proper placement of the gasket and attachment of the mounting nuts is key in preventing water from leaking in. Follow the directions on where to place the nylon and aluminum washers. Here's a picture of the rear of a mounted assembly for reference.
5. Step #6 in the supplied instructions shows a washer that is placed between the light assembly and car body on the inner bottom mounting point. Step #7 shows an aluminum washer placed over the outer bottom mounting point coming from trunkside after the assembly is in place. Heed the warning sticker and notation in the instructions regarding that nut since it should only be tightened to 2.5Nm. Too much torque will cause the mount to snap off. If the assembly doesn't fit quite right, try enlarging the 8mm or 16mm hole slightly. It is simple to see from the backside if the crescent cut is clearing the assembly properly. Some folks have noted that one of their assemblies is recessed further than the other, but I didn't notice that issue.
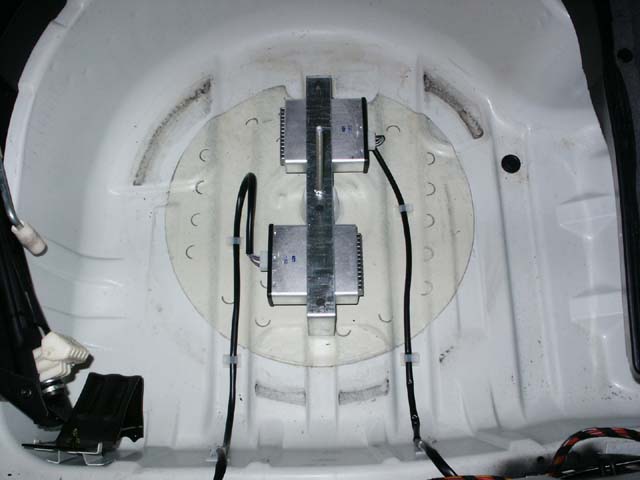
6. Mount the LED voltage regulators in the spare tire well as per the install guide and use tape or cable tie-downs for cable management. These parts are absolutely necessary when retro-fitting rear CELIS lights onto pre-2001 vehicles since earlier cars lacked these electronics which were built into post-2001 models.
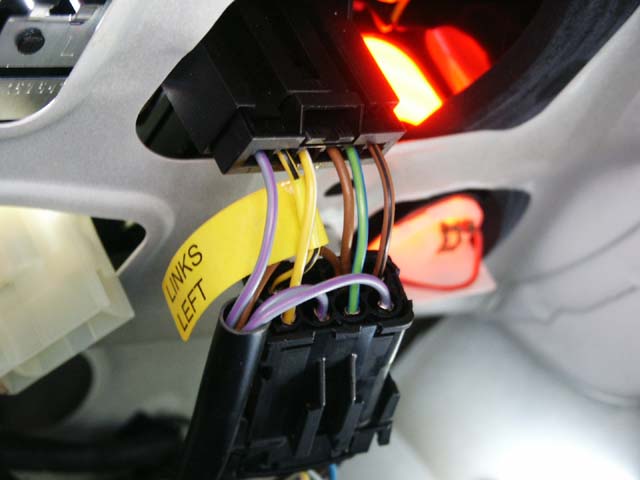
7. Here is the Euro-spec wiring pin-outs and a close-up of the adapter harness.
| Pin Number
| Driver-side
| Passenger-side
| Wire Color
| Function
| Wire Color
| Function
| 1
| Violet/Purple Stripe
| Parking Light CELIS LED
| Black/Blue Stripe
| Brake Light Bulb
|
| 2
| Yellow/Black Stripe
| Fog Light Bulb
| Brown/Blue Stripe
| Turn Signal Bulb
|
| 3
| Yellow/White Stripe
| Reverse Bulb
| Brown
| Ground
|
| 4
| Brown
| Ground
| Green/Black Stripe
| Reverse Bulb
|
| 5
| Green/Blue Stripe
| Turn Signal Bulb
| Yellow/Black Stripe
| Fog Light Bulb
|
| 6
| Brown/Black Stripe
| Brake Light Bulb
| Grey/White Stripe
| Parking Light CELIS LED
| | |
CELIS LED supply voltage is ~6VDC when plugged into the assemblies and ~10VDC when unplugged. All other bulbs are standard 12VDC.
8. Besides testing the new LED parking lights and other bulbs, it's recommended to pour water down the trunk with the trunk lid closed to ensure rain or car wash water doesn't leak past the new gaskets.
9. Check the Philips SilverVision page regarding US and Euro-spec fitment issues when installing silver-colored turn signal bulbs.
|
Questions? Comments? E-mail me:
|
 . .
|
Click Here to return to the Main Menu.

Optimized for 800x600 or higher resolution.
Copyright © Midnight Designs, 2002-2003. All Rights Reserved. All
images and registered trademarks are used to benefit and without intent to
infringe on the holder. Contents Subject to Change Without Notice.