BMWdiy.INFO
E39 Rear Fender Rolling
(Notes)
Prepared by VietSB
Modified 11.04.03
NOTE: Perform these steps at your own risk. All P/N's listed are a "best guess", so please double-check with your local dealer. These mods and repairs were performed on my US-spec 1997 540iA (11/96 prod date, M62 engine) but there is no guarantee they will work on other E39's. These instructions are provided for entertainment purposes only!
BACKGROUND: A very popular question posted to the board is "I'm getting bigger wheels, will I rub?". The answer is simply, "It depends...". Sorry, but it's not cut-n-dry. There are a number of factors to consider such as:
- Tire and rim size
- Rim offset
- Non-sport, sport, or aftermarket suspension
- New, old, soft, or sagging suspension
- Prior suspension damage due to an accident, etc
Generally, with moderately plus-sized tires, the recommended precaution of rolling the fenders is usually enough. The next recommendation is M5 fender liners and the most extreme is to flare the fenders and pull the rear portion of the fender out a bit.
In a way, rubbing is a good thing. It's an early warning of clearance issues and usually leaves visible evidence as to the area that requires work. The worst indicator is "cutting" or "scraping" where the tire actually gets cut by the protruding fender lip or something gets partially damaged due to wheel contact.
Fender rolling consists of folding the inner lip of the wheel well arch into a tighter V-shape or completely flat U-shape which will enhance clearance. Changing to M5 liners allows extra vertical wheel clearance inside the fender well. The different M5 liner shape also allows the inner lip to be folded back even further. As an example, the M5 has OEM 18x9.5" rear rims with 275/35-18 rubber. Running your finger along the inner lip will reveal a *completely* folded lip. The last step of flaring the fenders or pulling the fender out a bit is required if running extremely large wheels, such as 19's or 20's (dubs).
If you experience rubbing, remove both rear wheels and carefully inspect the wheel liner and entire lip to determine the rub points. Look at the tires as well since they'll usually add important info regarding rub spots. A common rub spot even after rolling and M5 liners is the junction point at the back of the wheel well where the metal body meets the plastic bumper. For some unknown reason, it's also common for this rub spot to be on the passenger-side only.
I won't go into too much detail regarding the rolling process since it is highly recommended to have a professional perform the work, so I'm just giving some background info and hints/warnings for DIY'ers. Two warnings I will give are:
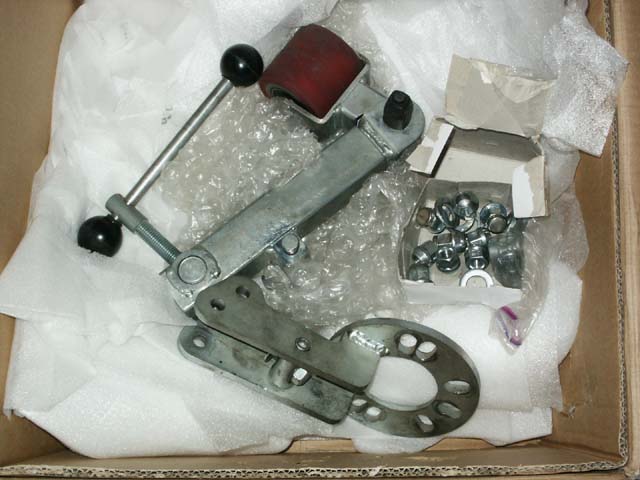
- "Where to get the roller?" I rented the roller from Tire Rack, but it was in fairly poor condition (i.e. semi-broken) and took something like 6 months to get. You might want to check online for any rental places that might have it available, although that's pretty difficult. If you had ~$500 available, they cost about that much. Again, it's probably more economical to spend the ~$200 and have a pro w/ experience do it for you.
- Many of the rollers will only have an ~72.4mm bore (center hub size), so they will have a hard time fitting over the 74.1mm E39 hub. Washers or some type of shim might need to be used, as well as longer lug bolts, such as would come with wheel spacers.
Required Tools:
- Standard wheel service tools and jacking equipment
- Haweka fender roller or equivalent
- Quality heat gun
- Cleaning supplies
- Work light

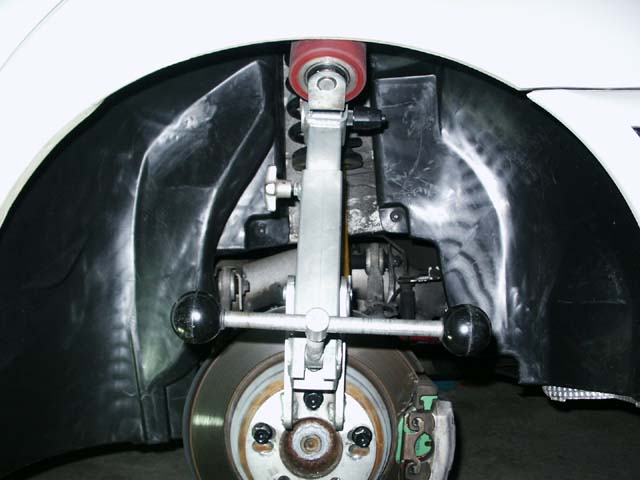
1. The entire rear end should be lifted and supported with jackstands so both wheels can be removed. The car is usually placed in neutral to allow the rear wheels to spin freely. Clean all the areas the roller will be touching and mount the roller to the hub via lug bolts. I caution you that the center bore might be incorrect for E39's, so washers and longer lug bolts might be necessary. Also, don't use your original lug bolts unless you have some long enough to use the protective coned washers as well.

2. Following the roller instructions, the paint should be properly heated at all times to avoid cracking, the roller constantly positioned perfectly for the intended roll spot, and the rolling can begin with short back-and-forth motions while slowly cranking the roller outwards. It only takes about 1-2 fenders before you get the hang of it. I believe our thin paint is fairly roller-friendly as I worked on 5 cars with zero paint issues (knock on wood). Again, a professional is recommended. This picture shows the difference between a non-rolled and rolled section. Please note that the M5 liners leave a lot of space for the fender to be completely rolled back. With the OEM liners, the fender will be rolled against the liner.

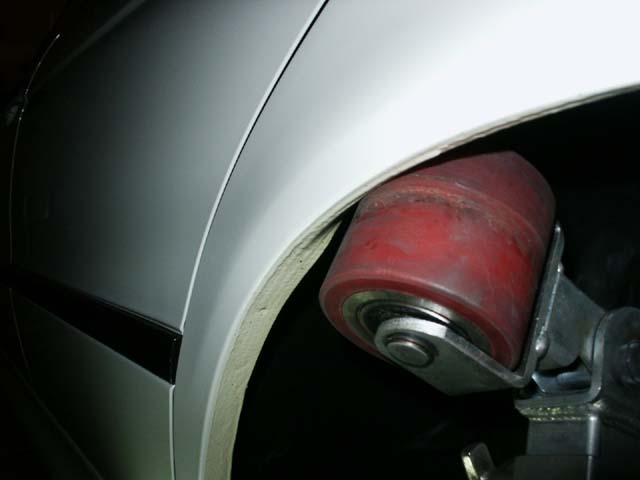
3. BMW pre-rolls a portion of our fenders as you can see in this pic. Using the tool, it's possible to fold the fenders further if necessary. Exercise caution when rolling this area as the tool tends to slip easily and often takes paint with it.

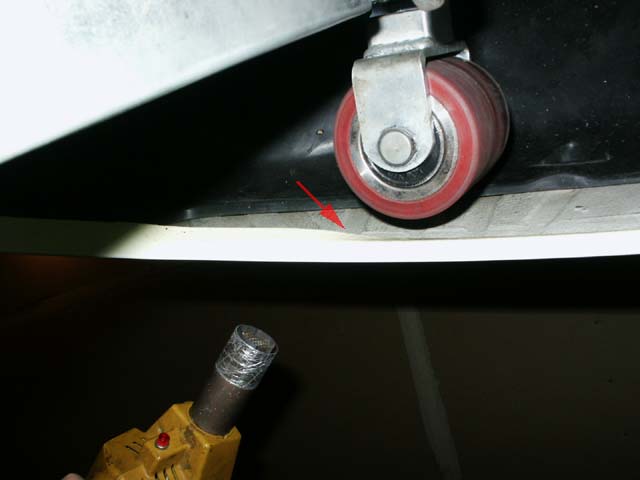
4. This is the trouble spot I was talking about (see arrow). It's very difficult to roll this area and might require the fender to be pulled out just a bit using bodyshop tools. This picture shows the driver-side, but the passenger-side was my only remaining rub point.

5. If you require M5 liners, click here for those DIY instructions. If you require fender pulling/pushing for the troublesome rear passenger area, click here.
|
Questions? Comments? E-mail me:
|
 . .
|
Click Here to return to the Main Menu.

Optimized for 800x600 or higher resolution.
Copyright © Midnight Designs, 2002-2003. All Rights Reserved. All
images and registered trademarks are used to benefit and without intent to
infringe on the holder. Contents Subject to Change Without Notice.


 .
.